Looking for a super simple way to whip up a tasty Indian bite? This paneer tikka recipe oven method is a total game-changer. Forget the fancy stuff; we’re talking about getting those delicious, spiced paneer cubes and veggies ready without any fuss. It’s perfect for when you need a quick appetizer that still feels special. Seriously, it’s so easy, you’ll wonder why you didn’t try it sooner.
Key Takeaways
- This paneer tikka recipe oven method is designed for speed and simplicity, making it an ideal quick Indian appetizer.
- The recipe focuses on marinating paneer and vegetables in yogurt and spices before cooking them in the oven for a flavorful result.
- It’s a versatile dish that can be served as a starter or even as part of a main meal with sides like naan or rice.
Understanding Paneer Tikka
What Is Paneer Tikka?
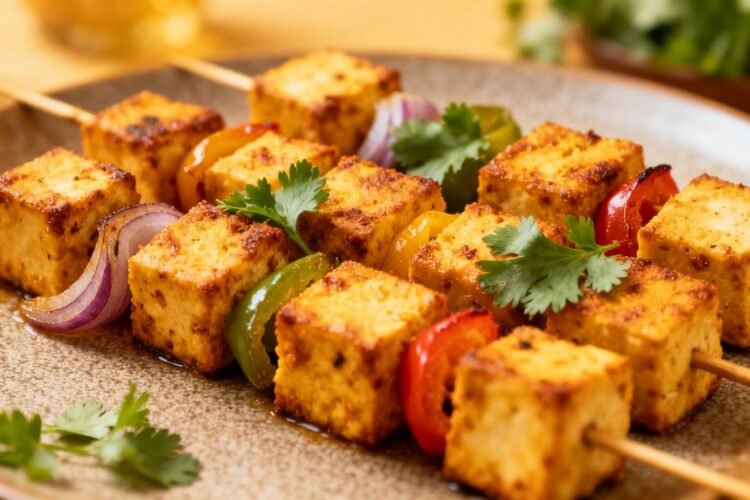
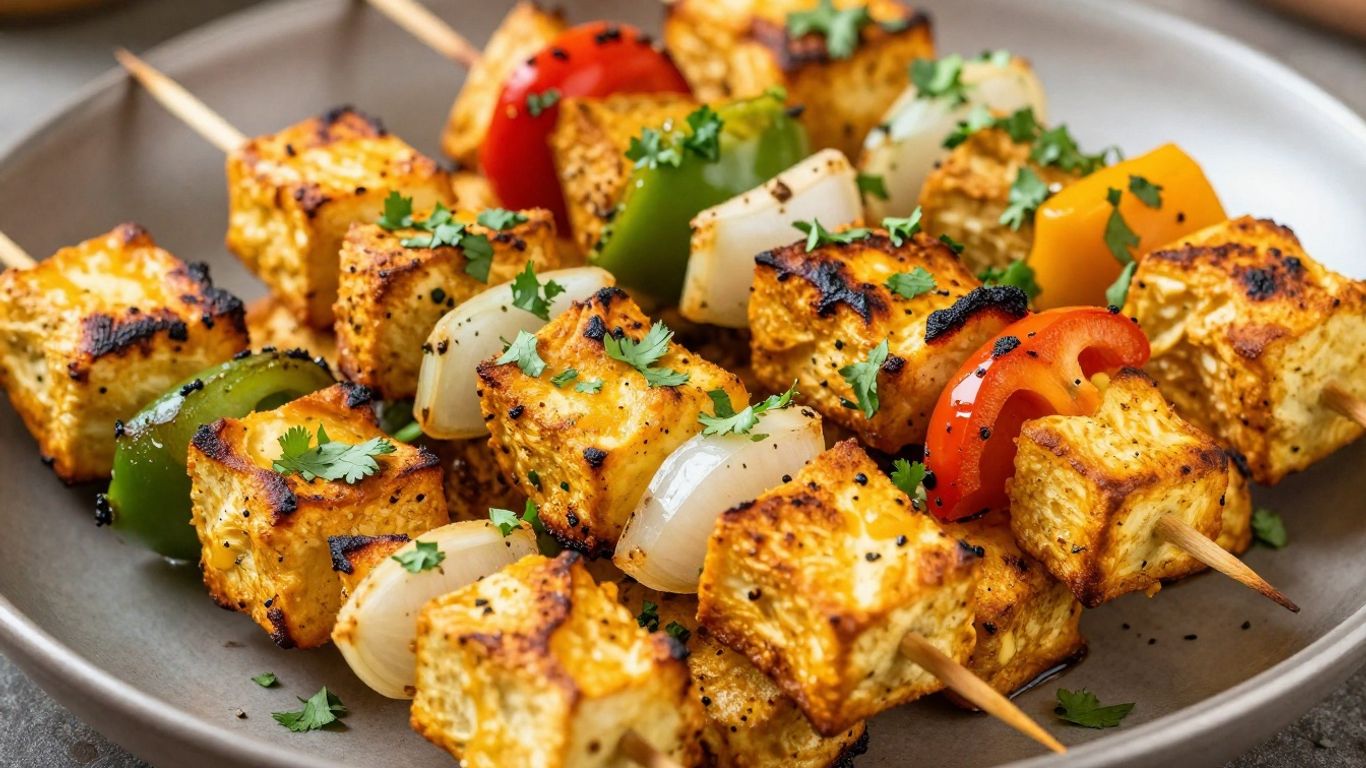
Paneer tikka is a really popular starter from North India. Basically, it’s cubes of paneer, which is a type of Indian cottage cheese, marinated in spices and then cooked. Usually, these cubes are threaded onto skewers with chunks of colorful bell peppers and onions. The traditional way to cook them is in a tandoor, which is a special clay oven, giving them a slightly smoky, charred flavor. It’s a vegetarian dish that’s packed with flavor and texture.
Why This Paneer Tikka Recipe Works
This recipe is great because it takes that classic paneer tikka and makes it super easy to do at home, even without a tandoor. We’re using the oven, which is something most people have. The marinade is key here; it tenderizes the paneer and infuses it with all those delicious Indian spices. Plus, adding veggies like bell peppers not only makes it look pretty but also adds a nice crunch and sweetness that balances the spices.
- Simple Marinade: A mix of yogurt and spices creates a flavorful coating.
- Oven-Friendly: No special equipment needed, just your regular oven.
- Customizable: You can easily swap out vegetables or adjust spice levels.
- Quick Prep: Most of the work is just chopping and mixing.
This dish is a fantastic way to get a taste of Indian cuisine without a lot of fuss. It’s perfect for when you want something a little special but don’t have hours to spend in the kitchen. The combination of soft paneer and crisp vegetables is just spot on.
Crafting Your Paneer Tikka Recipe Oven
Now that we’ve talked about what paneer tikka is and why this recipe is a winner, let’s get down to business. Making this in your oven is surprisingly straightforward, and honestly, it’s a great way to get that delicious, slightly smoky flavor without needing a fancy tandoor.
Essential Ingredients For Paneer Tikka
To make this happen, you’ll need a few key players. First up, the star: paneer. You want about a pound of it, cut into nice, bite-sized cubes, maybe an inch or so. Then, we’ve got the veggies. Think bell peppers and onions, also cut into similar-sized chunks. Some people like to add tomatoes too, but that’s totally up to you. For the marinade, which is where all the magic happens, you’ll need thick yogurt (like Greek yogurt, or just regular yogurt that you’ve strained a bit), chickpea flour (besan), some oil (mustard oil is traditional, but any neutral oil works), and a bunch of spices. We’re talking ginger-garlic paste, Kashmiri red chili powder for color, coriander powder, garam masala, and a little something called chaat masala for that tangy kick. Don’t forget crushed dried fenugreek leaves, or kasoori methi, if you can find it – it adds a really nice depth. And of course, salt.
Here’s a quick rundown of what you’ll need:
- Paneer: About 1 lb (400-450g), cut into 1-inch cubes.
- Vegetables: 1 medium onion and 1 bell pepper (any color), cut into 1-inch chunks. Optional: 1 tomato, also cubed.
- For the Marinade:
- 3/4 cup thick yogurt
- 2 tablespoons oil (mustard or neutral)
- 1 tablespoon besan (chickpea flour)
- 1 tablespoon ginger-garlic paste
- 1 teaspoon Kashmiri red chili powder
- 1 teaspoon coriander powder
- 1 teaspoon garam masala
- 1 teaspoon chaat masala
- 1 teaspoon crushed kasoori methi (dried fenugreek leaves)
- Salt to taste
- For Skewering: Bamboo skewers, soaked in water for at least 30 minutes.
Step-By-Step Oven Preparation
Alright, let’s get this marinated and into the oven. First, you’ll want to mix up that marinade. In a bowl, combine the yogurt, oil, besan, ginger-garlic paste, all your spices, kasoori methi, and salt. Give it a good stir until it’s smooth and well combined. Now, toss in your paneer cubes and veggie chunks. Make sure everything is nicely coated. Cover the bowl and let it sit for at least 30 minutes. If you have time, popping it in the fridge for a couple of hours, or even overnight, will make the flavors even better.
While that’s marinating, get your bamboo skewers ready by soaking them in water. This stops them from burning up in the oven. Once everything’s had a good soak in the marinade, thread the paneer and veggies onto the skewers, alternating between them. Don’t pack them too tightly; you want the heat to circulate.
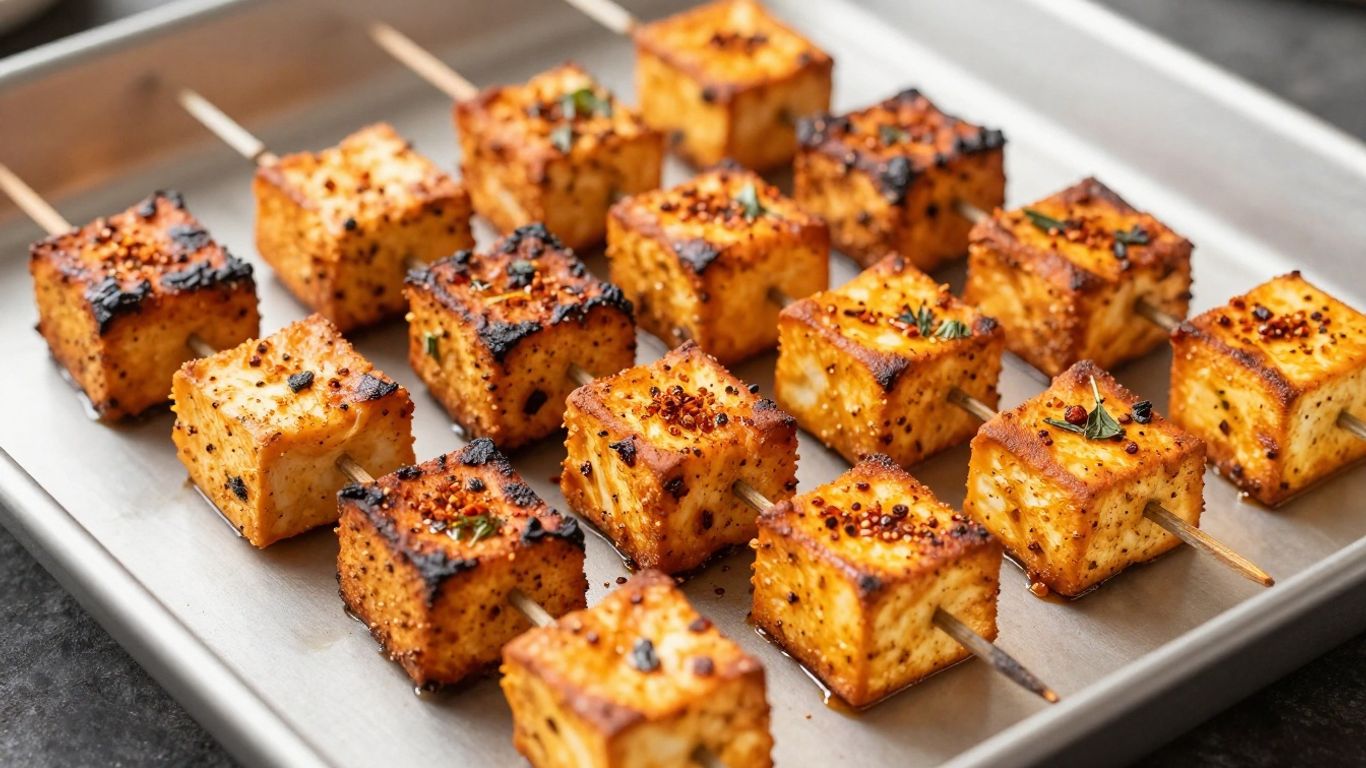
Now, for the oven part. Preheat your oven to 400°F (200°C). Line a baking sheet with foil for easy cleanup, and place a wire rack on top of it. Arrange your skewers on the wire rack. This helps the heat get all around the tikka. Pop the baking sheet into the preheated oven and bake for about 12-15 minutes. You’re looking for the paneer to get a nice golden-brown color with slightly charred edges. If you want them a little crispier or more charred, you can switch the oven to broil for the last 1-2 minutes, but keep a close eye on them so they don’t burn!
Cooking paneer tikka in the oven is a fantastic way to achieve that restaurant-style flavor right in your own kitchen. The key is the marinade and getting the oven temperature just right so the paneer cooks through without drying out, while still getting those lovely browned edges.
Tips For Perfect Paneer Tikka
Getting your paneer tikka just right is all about a few key details. It’s not complicated, but paying attention to these points can make a big difference in the final taste and texture. Let’s get into some of the little things that make this appetizer shine.
Marination And Skewering Techniques
The marinade is where all the flavor magic happens, so don’t rush it. For the best results, let your paneer and veggies soak in that spiced yogurt mixture for at least 30 minutes. If you have the time, marinating for a few hours or even overnight in the fridge will really let those flavors sink in deep. Paneer is a bit dense, so it needs that time to absorb everything.
When you’re ready to skewer, remember to soak your bamboo skewers for about 30 minutes beforehand. This simple step stops them from burning up in the oven. When you’re threading the paneer, onions, and peppers, try to leave a little bit of space between each piece. This helps everything cook evenly and get those nice, slightly charred edges we all love. Don’t pack them too tightly!
Here’s a quick rundown on skewering:
- Soak bamboo skewers for at least 30 minutes to prevent burning.
- Thread paneer, onion, and bell pepper pieces, leaving a small gap between each.
- Consider wearing food-grade gloves when handling the marinated ingredients to avoid staining your hands, especially from turmeric.
A little tip for handling the marinade: if you’re worried about turmeric staining your hands, just pop on some food-grade gloves. It keeps your hands clean and odor-free after you’re done assembling.
Serving And Storing Your Tikka
Paneer tikka is fantastic served hot, right off the heat. It’s traditionally an appetizer, and serving it on small skewers makes it super easy for guests to grab. A side of mint or cilantro chutney is pretty much a must for that authentic Indian flavor. You can also serve it as part of a larger meal, maybe with some naan bread and a cooling raita.
If you happen to have leftovers (which is rare in my house!), you can store them in an airtight container in the refrigerator for up to two days. Reheating is best done in a pan or oven for a few minutes to bring back some of that crispiness, though they won’t be quite as fresh as when they were first made. Microwaving can make them a bit soft, so I usually avoid that if I can.
Enjoy Your Easy Paneer Tikka!
And there you have it! A super simple way to get that delicious paneer tikka flavor right in your own kitchen, without needing a fancy tandoor oven. Whether you serve these colorful skewers as a starter for your next get-together or even as a light main course with some naan, they’re sure to be a hit. It’s proof that you don’t need a lot of fuss to make something really tasty. Give it a try and enjoy a little taste of India, made easy!
Frequently Asked Questions
What exactly is Paneer Tikka?
Paneer Tikka is a super popular Indian snack. It’s made with soft cubes of paneer (a type of Indian cheese) that are threaded onto sticks with yummy veggies like onions and peppers. These are then cooked until they get a little bit browned and smoky.
Is Paneer Tikka healthy to eat?
Yes, it’s a pretty good choice! Paneer Tikka is packed with protein from the paneer and vitamins from the veggies. It does have some fat, but it’s mostly good fats that help you feel full and satisfied.
How do I reheat leftover Paneer Tikka?
If you have any leftovers, the best way to reheat them is in an air fryer. Just put the tikka back in the basket and cook for about 2 minutes at 360°F. This helps bring back some of that yummy crispiness.